Thursday, April 28, 2016

Cottage Rose - Kaisercraft

Hello everyone, thanks for stopping by here today and for all the ladies who left comments on my blog and on my Facebook page, thanks for all your kind words and friendship… Big hugs XX for today, I am sharing the rest of my projects created for Kaisercraft this month….

Every month Kaisercraft, release new papers and to compliment the papers are new Embossing Folders and Decorative dies.

This month in the Kaisercraft Workshop magazine for April 2016, on page 9 of this great inspirational magazine is page dedicated to Embossing Folders.There are some fantastic examples of what you can create with them.
Here is the link to the magazine HERE

Embossing folders are fabulous for adding depth and texture to plain papers. All embossing folders are usually made of plastic and are intended to be used with a manual machine, e.g... Hot Shot Sizzix or Cuttlebug. These machines are usually die cutting machine but they can emboss as well.
Each machine is different, so please read your instructions on which platform to use for creating with Embossing Folders.

The embossing folder that I will be highlighting this month is 
the new release folder - EF239 Decorative Frame.


With this one embossing folder you can create many different projects.

The size of this particular embossing folder EF329 Decorative Frame, is so perfect for a C6 folded card stock.

Placing the a Folded C6 card inside the flaps.
and running it through your machine (make sure that you use the correct platform for embossing folders)

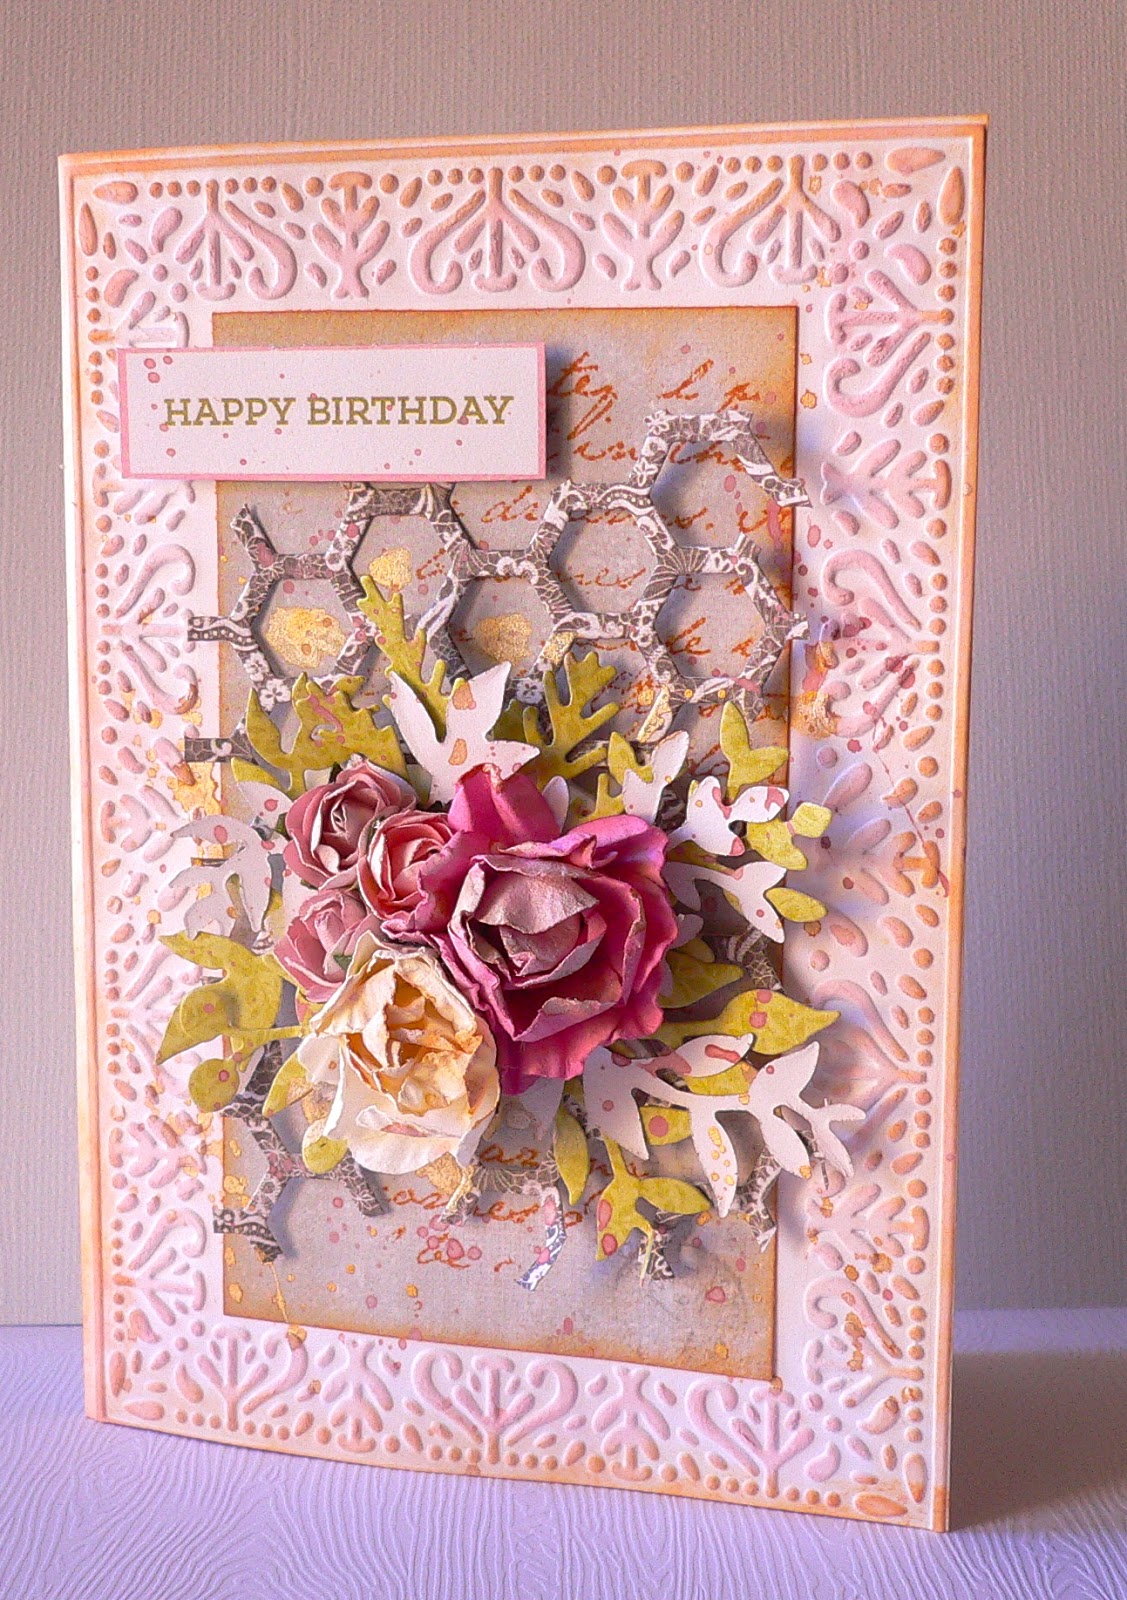
The result is a very effective border around the card, here is my card that
I slightly inked the raised decorative image to highlight the texture and detail of this beautiful embossed details.

Using the Cottage Rose Papers and embellishments 
I decorated the centre of my card.

"Happy Birthday" card by Adriana Bolzon


Kaisercraft Products: Cottage Rose Paper Pad PP995, F641 Dusty Pink Blooms, IP725 Ink pad Petal Pink, IP725 Vintage Ink pad, DD551 Hexagon die, DD374 Mini Leaves Decorative Die, Clear Stamp CS257 Background Script,C6 Card Pack CD511 white, Kaisermist Antique Gold KM102. 


So, I finish today blog post with 2 more cards and a layout that I have created all with the Cottage Rose paper collection. 

"Special Day" card by Adriana Bolzon


Kaisercraft Products: Cottage Rose Paper Pad PP995, Cottage Rose- Paper P2077 Frames, F641 Dusty Pink Blooms, IP725 Ink pad Petal Pink, IP725 Vintage Ink pad,  DD374 Mini leaves Decorative Die ,C6 Card Pack CD511 white, Kaiser-mist White KM111, CD114 Cardstock Forest.


"Happy Birthday" card by Adriana Bolzon


Kaisercraft Products: Cottage Rose Paper Pad PP995, Cottage Rose- Paper P2077 Frames, F641 Dusty Pink Blooms, IP725 Vintage Ink pad, DD374 Mini Leaves Decorative Die, Square Card Pack CD501 white, Kaisermist Antique Gold KM102. Other: twine.


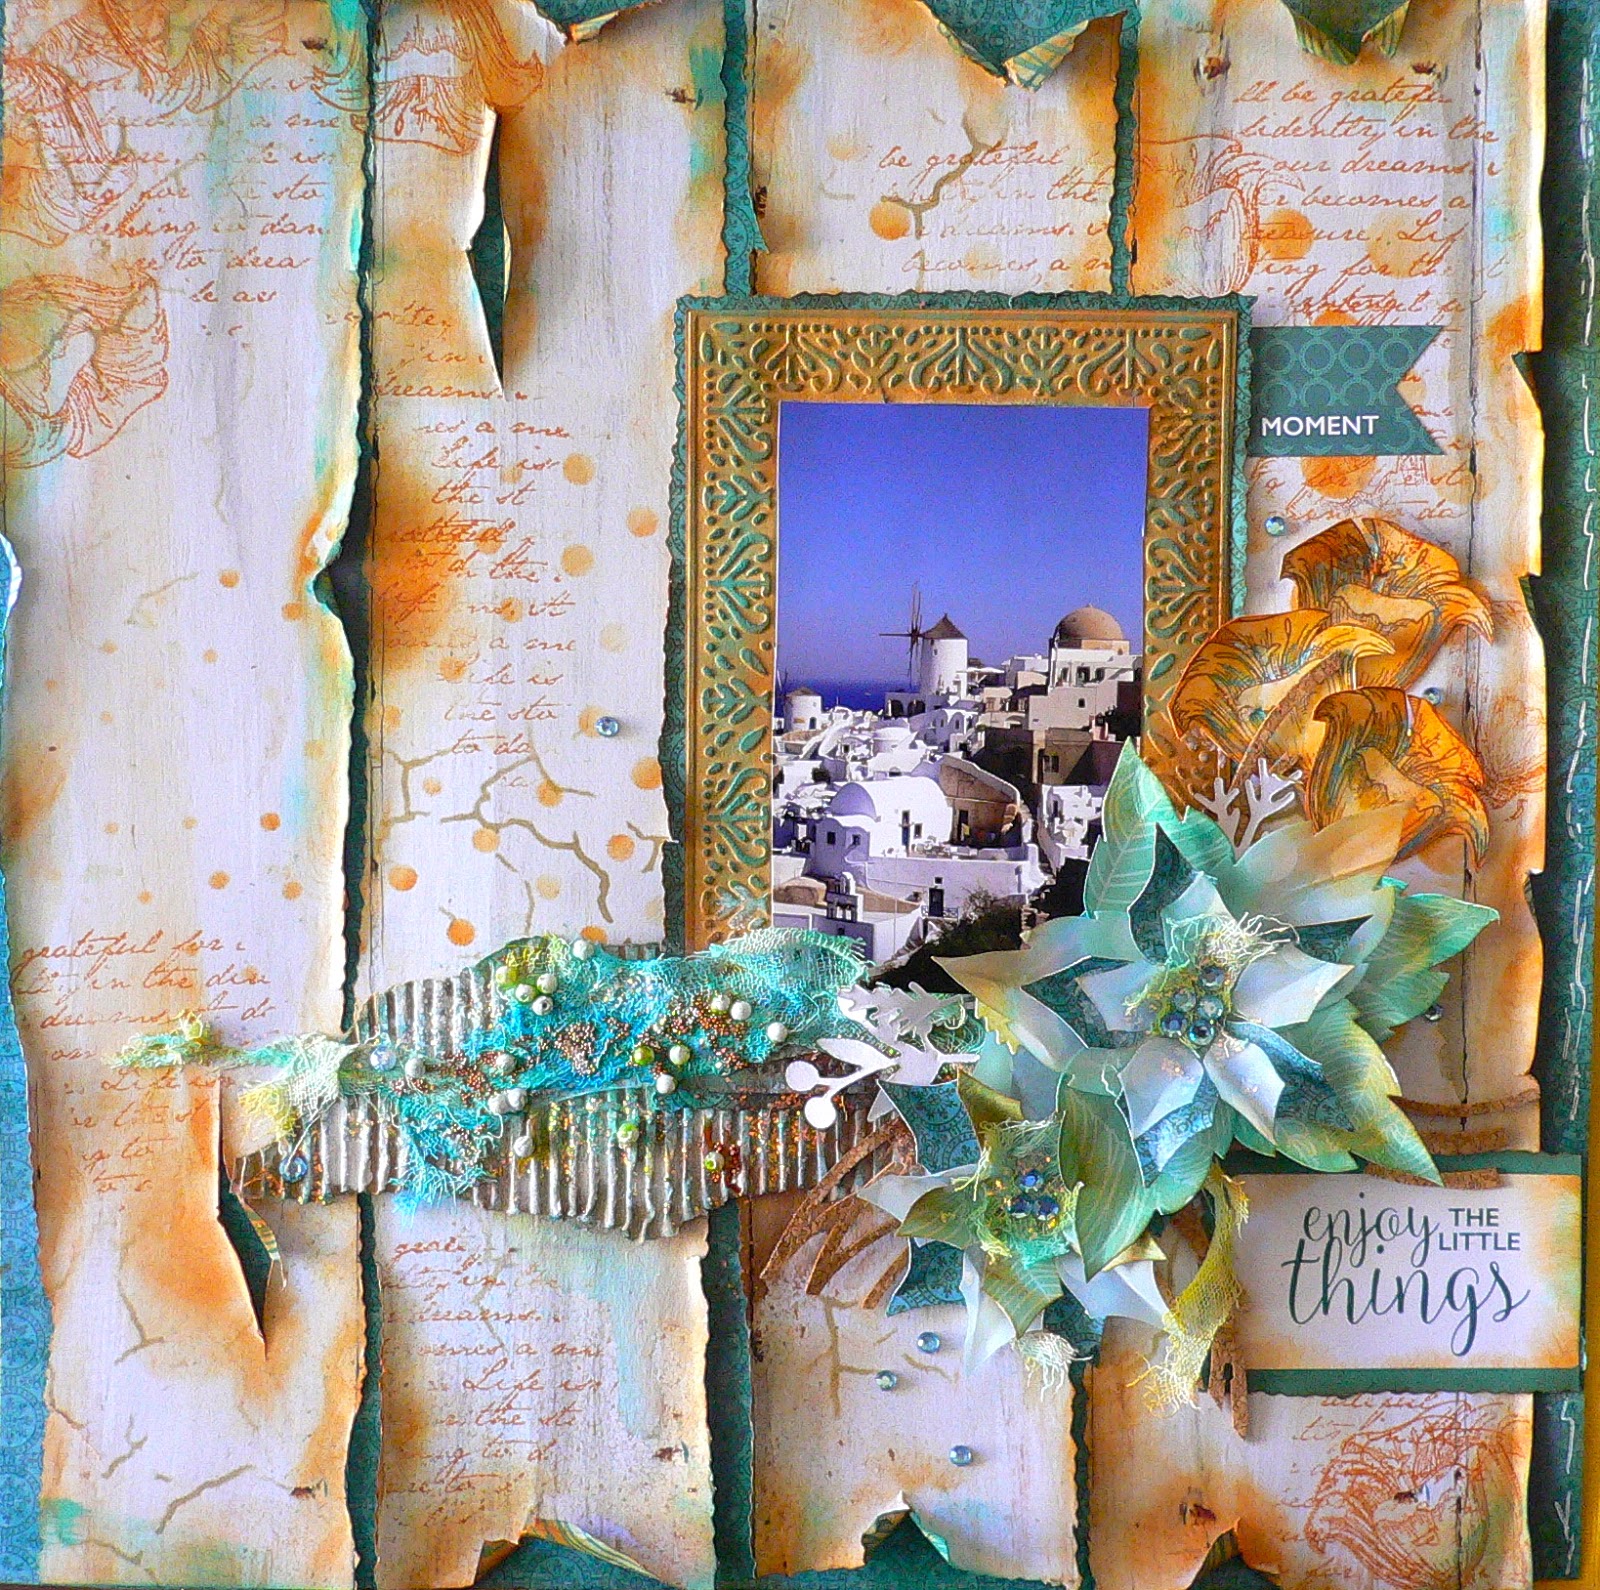
and for my final project a layout created with Cottage Rose collection. 
"Dreams" layout by Adriana Bolzon


Kaisercraft products: Cottage Rose Papers P2076 Quilt, P2071 Welcome,  Cottage Rose- Paper P2077 Frames, F641 Dusty Pink Blooms, F639 Fuchsia paper blooms, IP725 Vintage Ink pad,IP725 Petal Pink, DD547 Circle Vines, Clear stamp CS259 Background Floral Lace, Cardstock CoffeeBean CD108, Lace EM927, Rhinestones strips RS453,  DD374 Mini Leaves Decorative Die,  Kaisermist Candy Pink KM115 & White KM111, Clear stickers ST928 Life. Other: twine.


Well, that's all for today,
Have a great week…..
Cheers Adriana XX

Tuesday, April 26, 2016

2016/17 Kaisercraft Design Team Application

Well, Hello to all my crafty friends !! Thanks for stopping by here today !
Today, I have some super, super exciting news to share with you all
and also to hope for, I have been on selected as a finalist
for the 

Kaisercraft Contributing Design Team for 2016 & 2017.

Part of the second round of Auditions for
Kaisercraft Design Team is to create a project with a new amazing
paper collection, called "BOHO DREAMS" with step by step instructions
with photographs, tips and techniques.

I have been super, duper Lucky to be part of this wonderful Design Team for a few
years now. I do hope to continue working and creating with Kaisercraft
 new paper collections and products, their products are so gorgeous and they are Australian made and designed. I hope my creations inspire you all to buy their papers and embellishments. I am very thankful to play my part in creating projects for Kaisercraft.

Being on this Design Team is a dream come true, so I do hope that
I can stay for another year. (Fingers and toes crossed !!!) 

So, when I received my package from Kaisercraft, the other day
and fell in love with these new papers, 
I created a layout with some of the papers, stickers sheet and added some Kaisercraft products and goodies to highlight the papers.

I wish everyone the best of luck and fingers crossed for
some of my scrappy, crafting and happy friends. 

So here goes............. my Auditioning blog post for the
Contributing Kaisercraft Design Team 2016-17.

"Forever Free & Forever Young" layout by Adriana Bolzon
 Created with the BOHO DREAMS paper collection.


 The BOHO DREAMS papers are soon to be released in June this year. So you will all get a sneeky, peeky at this wonderful new paper collection. This paper collection is inspired by the Bohemian hippie influence, with the ideas of a carefree life and day-dreaming days. I have this photo of my daughter when she was younger, we went to a nearby park. Scattered around, in this park are these massive large fig trees. The trees are featured in all the photos I took that day, they made a great back drop for my photos. The park is such a peaceful place and we took many photos of the trees and of course, many photos of my daughter. 

The BOHO DREAMS papers are designed in natural earthy tones with touches of orange, green, browns and hint of blue denim. The flowers are so pretty in this collection, I had to fuzzy cut them out. I love the touches of feather icons and the dream-catcher images are really lifelike and pretty. I wanted to capture the other elements of this paper collection, in particular the innocent face images with the forever young theme. My Flower Child. 

A full list of the Kaisercraft products I used to create this layout are all listed below at the end of this post. But here are the main Kaisercraft Products that I wanted to highlight.


To create this page - my step by step tutorial.

Trim the edges of the Boho Dreams - P2108 Young paper  to 29cm x 29cm.


Distress the edges of the paper with a distress tool and using a blending tool and Kaisercraft IP723 Vintage ink pad, ink around the edges of the paper.


Using the above Template "LOVE" IT910 and Vintage Inkpad and Bleeding tool, randomly ink around the page, using with the Brick image template.


Adhere the page to the centre of the BOHO DREAMS - Paper P2110 Free.


Again with the same Template "LOVE" IT910 and some texture paste, gently rub the paste over the template with the hearts image, on to the page, randomly in the centre and leave to dry. 

Dip a large water brush into the KaiserMists bottle and sprinkle the colour gently in the centre of the page. Tapping your finger against the brush, allowing sprinkles of the colours splatter over the page. 
(Tip: Use the Mist KM111White first, then the KM107 Peach & lastly the Mist colour KM106 Denim.)


Cut square pieces of paper from the Boho Dreams collection
P2110 - Free - cut to size -12cm x 12cm
P2111 Wanderer - cut to size -11.5cm x 11.5cm
P2111 Wanderer (reversed side)- cut to size - 11cm x 11cm
Distress all the edges with a distress tool
Ink edges with Vintage Ink pad.

Trim your photograph to size -10 cm x 10 cm


Adhere each layer on top of each other with double sided tape.


Fuzzy cut flowers from the P2109 Wild paper, then ink edges.


Adhere flowers and the matted photograph on to the page, as shown below.
Create clusters of flowers on the bottom and top of photograph.

Adhere one small flower on the image of the young girl's head.


Cut feather images from the (reverse side) P2107 Feathers


Ink the edges of the feathers with Vintage Ink Pad IP723


Adhere feathers with double sided tape under the cluster of flowers.
(as shown below)

Cut two sets of Mini Foliage with Kaisercraft Cork sheetsCB152 -  &
Decorative Die DD374 Mini Foliage, glue these on around the edges of
the flower clusters. 


Cut 2 sets of the word "forever" from Kaisercraft Decorative word
 DD760 Family Words & with Kaisercraft Glitter Cardstock
Midnight GC101 (black) 
With the second word, cut out the "f" "re" and "e"
to make the word "FREE"
(HINT: see how many other words you can create with this single word)


Glue down the words on the page

Place sticker words from the Sticker sheet 


Adding some touches of colour with the watercolour pencils to the face image on the bottom left of the page.

Adding a cluster of Coral mini paper blooms and twine in the centre of the flower cluster.
Add the Aqua Rhinestones SB703 around the whole page.


Also using a white Uniball pen draw some stitching lines around the edges of the page.

and there you have it ….. the completed finished page :)

"Forever Free - Forever Young" by Adriana Bolzon


Kaisercraft Products used:
BOHO DREAMS Papers P2107 Feathers, P1208 Young, P2109 Wild, P2110 Free, P2111 Wanderer. SS315 Boho Dreams sticker sheet, 
Kaisermists: KM111 White, KM107 Peach, KM106 Dream, Designer Template IT910 Love, Inkpad IP723 Vintage, Rhinestones SB703 Aqua, Cork sheet CB152, Foam Tape T303, Double side tape T314, Kasiercraft Decorative dies:DD374 Mini Foliage, DD760 Family words, Glitter card stock GC101 Midnight,Twine/string LDB1059, Coral Mini Blooms FLF667

Other: distress tool, white uniball pen, watercolour pencil.


***

Wish me luck and thanks for looking.
Thankyou, also for all your comments, and for following my blog
I love reading all your comments...….
Here is the link to the Kaisercraft Blog HERE
and for all the latest ideas and projects from the current team.

Have a great week.....Cheers Adriana :)
XX

Tutorial for Kaisercraft


Hello everyone, today I on the Kaisercraft blog, sharing a tutorial and tips with Kaisercraft products.

Kaisercraft April collection of papers are both beautiful collections,
"Cottage Rose" & "Sea Breeze".

Here is a layout that I have created using the Sea Breeze paper collection.

"Enjoy the little things" layout by Adriana Bolzon


Kaisercraft Materials: Sea Breeze paper collection P2020 Sea, P2016 WaterLilly, P2024 Whirlpool, CD651 Kraft card stock sheet, Stampset CS253 Sea Breeze, P2023 Splash, Vintage Ink pad IP723, Lagoon Ink pad IP727, KaiserMists: KM105 Turquoise, Template Bubbles IT605,Template Crackle IT905 embossing folder EF239 Decorative Frame, RS402 rhinestones Island Lagoon, CB153 Corrugated Cardboard, CB152 Cork, DD720 Layered Poinsettia flowers, DD374 Mini Foliage, DD312 Decorative Leafs. Other: Vellum, Muslin, beads.


I handmade the flowers with the papers and dies from Kaisercraft and my tutorial today is going to show you how to create these flowering beauties.


 I created these flowers with the Kaisercraft DD720 Layered Poinsettia flower die 


and the DD312 Decorative Leaves die cuts.


Normally these dies would be to create beautiful Christmas themed Poinsettia flowers and just leaves for clusters of flowers.  But, I wanted to show you how versatile these dies are, and you can create any flowers that compliment any papers.


Looking at the images on the papers of "Sea Breeze" you will notice that flowers do have star like look and layers to them. 
They are graphical Waterlilly flowers, these were my inspiration for creating these flowers.

P2016 Waterlilly - Sea Breeze paper


Materials required to create you own Waterlilly flowers


Other materials required: 
Muslin - coloured with Kaisermist Turquoise KM105
Foam tape
Double sided tape
Plain Vellum paper
Glitter glue
2' circle punch or circle diecut.

Step 1 & 2


Step 3 & 4


Step 5 & 6


The finished Waterlilly flower, ready to add to your project :)


I also created a smaller version of this flower, without the leaf die, just 3 of the poinsettia flowers cut out with vellum and papers then adhered them on top of each other, overlapping each other.


Every month Kaisercraft, release new papers and to compliment the papers are new Embossing Folders and Decorative dies.

This month in the Kaisercraft Workshop magazine for April 2016, on page 9 of this great inspirational magazine is page dedicated to Embossing Folders.There are some fantastic examples of what you can create with them.


Embossing folders are fabulous for adding depth and texture to plain papers. All embossing folders are usually made of plastic and are intended to be used with a manual machine, e.g... Hot Shot Sizzix or Cuttlebug. These machines are usually die cutting machine but they can emboss as well.
Each machine is different, so please read your instructions on which platform to use for creating with Embossing Folders.

The embossing folder that I will be highlighting this month is 
the new release folder - EF239 Decorative Frame.


With this one embossing folder you can create many different projects.
They are many techniques that you can use with embossing folders, but today I wanted to show you all that just one Embossing folders can used on many different projects.

I used it here on my layout with the Sea Breeze paper collection. Using the Embossing folder EF239 Decorative Frame to frame my photograph. I Embossed this folder on to a piece of Kaisercraft - kraft card stock, then inked the raised edges with Lagoon Ink pad.


Well, that's all for today,
my projects created with the 
"Cottage Rose" paper collection will be on Thursday 

Thanks for looking ….Cheers Adriana XX


Saturday, April 23, 2016

Design Team Call - Couture Creations


Hello everyone :) If you ever wanted to be on the 
Couture Creations Design Team
the DT call has gone live……...

The Couture Creations | Ultimate Crafts Design Team Call for 2016/2017


Visit the BLOG for all the details…..

You have until the 8th May 2016  ….. Best of Luck :)

Cheers Adriana  XXX

Wednesday, April 20, 2016

Drifting Feather layout - Magnolia Lane

Hello there everyone , sharing with you all today another tutorial for Couture Creations - Ultimate Crafts using the wonderful " Magnolia Lane papers"  and embellishments which have been Designed by Sue Smyth.

Today I have created a very simple and pretty layout using 2 dies from the Magnolia lane,
the Drifting Feather die ULT157525
and the Magnolia Borders die ULT157527

Drifting Feather Layout by Adriana Bolzon


Here is the list of Ultimate craft - Magnolia Lanematerials

Magnolia Border die ULT157527
Drifting Feathers die ULT157525
Magnolia Flowers ULT157508
Papers - Magnolia Lane - Rosehip Memories ULT157488
& Sweet Music ULT157495
Magnolia Cabochons ULT157503
Pink Lace ULT157505
other materials are listed at the end of this blog post


1. With a manual cutting machine, Cut several different coloured (mainly pink and green) Feathers die cuts with the Drifting Feather die cut and Magnolia Papers. I also cut some White Glittery one with Couture Creation Glitter paper.
NOTE - keep the negative cut offs from this drifting die cut to use as a stencil for the background.


2. On a sheet of White card stock draw three circles roughly with a pencil. Using the negative cutoffs from the Drifting Feather die cut and Green Mint ink pad, randomly apply some colour around the drawn circles, as shown below. 


3. Adhere your photo in centre of page.
Cut the flowers from Rosehip Memories papers, adhere them around the photo.


4. Adhere the Drifting feathers die cuts around the page as shown below, using Glue Pen.


5. Continue around again with second line of Drifting feathers.


6. Cut 3 Magnolia Borders die cuts, as shown below.


7. Adhere your layout in the centre of Rosehip Memories paper, adding a border at the top and bottom of Pink lace , arrange the Diecut of Magnolia Borders at the top and bottom of lace, as shown below.

8. Adhere word chipboard title.
Place Magnolia Paper Flowers on the bottom left hand corner as shown below


9. Place Oval Cabochon in the centre of lace and paper border, at the top of page.

10. Add Glitzing Glitter Glue to feather, paper flowers and centre of cutout flowers.


"Drifting Feathers" layout by Adriana Bolzon


So here is the links to both Ultimate Crafts magazine and also to the Couture Creations catalogue HERE


Until next time, Thanks for looking :)
Cheers Adriana XXX

Couture Creations Website
Ultimate Crafts products
view all products HERE
Magnolia Lane


List of materials used: Magnolia Lane Ultimate Crafts - for Couture Creations

Ultimate Crafts - Magnolia Lane
Magnolia Border die ULT157527
Drifting Feathers die ULT157525
Magnolia Flowers ULT157508
Papers - Magnolia Lane - Rosehip Memories ULT157488
& Sweet Music ULT157495
Magnolia Cabochons ULT157503
Pink Lace ULT157505

Other products
Couture Creations Products
3D Glue Dots C0723817
Sponge Dauber C0723061
Glitzing Glitter Glue - Crystallina C0721971
Double side tape 
Double side foam tape
Turbo Glue Pen C0724389
Glitter paper - CO724575 (white)


Please make sure you add your email address to get the latest newsletters.

Don't forget to join 
Couture Creations FACEBOOK


for all the latest updates from Couture Creations.