Showing posts with label altered art. Show all posts

Saturday, December 12, 2020

Christmas time at home - Art Journalling with Adriana Bolzon

Hi everyone,  Adriana here today with my another art journal creative fun page.

It has been a really tough year for some of us, and I think this Christmas will be so important for many and for me it will be all about my family and spending Christmas time at home.

I created an art journal page - something bright and flowery (as I always like flowers!! )

Using the Layered Poinsettia stamp set from THE GIFT OF GIVING  to create the large beautiful blooms and using the Couture Creations Alcohol inks to colour in my art journal. I show you how I created my page in my you tube video , which is at the end of this blog post.


Thanks for stopping by, 
stay safe and take care
Cheers
Adriana XX
:)


COUTURE CREATIONS PRODUCTS
CO727910 The Gift of Giving - Layered Poinsettia stamp and die set CO727880 Bronze Metallic Alloy Alcohol ink C0727888 Champagne Metallic Alloy alcohol ink CO727668 Fuchsia Glitter Alcohol Ink CO727672 Cardinal Glitter Alcohol Ink CO727671 Verdant Glitter Alcohol ink CO727890 Jade Metallic Alloy alcohol Ink CO727378 Gold Pearl Alcohol ink CO727956 Orange Fluro Alcohol ink CO7273818 Quick release die Paper


Monday, February 5, 2018

Take a walk into my Garden !! -- C'est La Vie collection


Hi there everyone
thanks for stopping by here today.
 I am so excited to be sharing a special project that I have created
with the new release
"C'EST LA VIE" from Couture Creations.

I have created a framed canvas using some of the dies and chipboard pieces from the "C'est La vie" collection, together with some gesso and of course, some gold foiling with the Go Press and Foil Machine.  I had some much fun playing with the mix media elements; Anna Griffin Gesso and Embossing Pastes, all of which are available from Couture Creations. 
So, let's go for a walk into my garden!!


I purchased a white light weight 8" x 10" ornate frame from a cheap/dollar shop and rubbed some gold wax around the ornate elements of the edges, 
to distress the frame.
Using a canvas board to create my masterpiece, I firstly created a background with
Anna Griffin White Gesso CO724871 and 
Anna Griffin Embossing Paste CO724870 
together with paint, inks and fibres to create a garden bed, the blue sky and a garden path which leads to the beautiful Gazebo.


Using the fabulous Go Press & Foil CO725032 machine together with Gold foils, I foiled the chipboards from the collection.
I think they look fabulous!

C'est La Vie Hive of Bees chipboards CO725911
C'est la Vie word chipboard CO725917


C'est La VieGazebo decorative die CO725763


To create a bit a texture on the 
C'est La Vie Wrought Iron Gate chipboard CO725919, 
I embossed the chipboards gates with a combination of layers with the
Mirror Gold Embossing powder CO724970
Turquoise Super Sparkles Embossing powder CO724993


Love the cute - C'est La Vie French Bicycle decorative die CO725762


Using the decorative dies
C'est La Vie Geraniums layered die set CO725765
C'est La Vie Collection of Ferns die CO725764
to create a clusters of flowers for the top and bottom of the framed canvas.


I hope you have enjoyed my project for today.
Thanks and big hugs
Adriana XX

Couture Creations List of Materials
Go Press & Foil CO725032 
Gold Vintage Foil CO725355
C'est La Vie Hive of Bees chipboard CO725911
C'est la Vie word chipboard CO725917
C'est La Vie Wrought Iron Gate chipboard CO725919
C'est La Vie Ferns chipboard CO725916
C'est La Vie French Bicycle decorative die CO725762 
C'est La Vie - Gazebo decorative die CO725763
C'est La Vie Geraniums layered die set CO725765
C'est La Vie Collection of Ferns die CO725764
Mirror Gold Embossing powder CO724970
Turquoise Super Sparkles Embossing powder CO724993
Anna Griffin White Gesso CO724871 and 
Anna Griffin Embossing Paste CO724870 


Friday, September 16, 2016

Vintage Journey Challenge - Create within a Frame

I was so pleased and super excited to be asked to join 
"A Vintage Journey" as a Guest Creative.
Thanks so much for having me this month as a guest.

Here is the blog post over at "A Vintage Journey"


Here is my post -  Adriana Bolzon. 
I have been a devoted Card maker for many years and have been
Scrapbooking and Paper Crafting for well over 16 years.  I love creating, inspiring others and experimenting with different techniques. It is a hobby and creative outlet, which I am totally passionate about. I believe that preserving memories are important, and scrapbooking is a great way to create lasting treasures.


My style is classic with a distressed, shabby chic and vintage twist, with lots of attention to details. Another passion is creating altered art pieces, turning everyday items into works of art.
I live in beautiful Australia with my husband & daughter. I have been on many Design Teams including KaiserCraft, ArtDeco- Couture Creations, Imagainarium Designs & Meg’s Garden.
I have been published in many magazines around the world.

You can find my creations here on my blog:


I was so pleased to be asked to join "A Vintage Journey" as a Guest Creative.


For this month's challenge you have to create something inside a frame. Whatever you use show us how you have incorporated a frame on your vintage; shabby; mixed-media; art journaling; industrial or steampunk project. We can't wait to see all of your creative framing ideas! 
Just go to this link VIntage Journey : for more information.

So for my project - I found a frame with a canvas quote inside of it. It is quite a nice size to hand on the wall. I love recycling and altering items for displaying around the home or to give as gifts, so I am going to alter this framed canvas to look more vintage & shabby chic! 
Here is my finished project!!

"Create your own DREAMS"


This is what it looked like before I altered it! 
Nice quote but a very plain display frame.


I applied a couple of coats of "Anna Griffin" white gesso on the frame and inside on the canvas background.
I applied some "Anna Griffin" texture paste inside the frame on to a
Anna Griffin stencil "Ironwork", once dry - I applied some Distress spray stain and Distress inks over the texture paste design. With a touch of gold embossing on the top of the textured design.


I sprayed inks, embossed all over the Imaginarium Designs chipboards frames, vines words & butterflies. Adding some pretty flowers here and there.


Imaganirium Designs  vines, butterflies, frame chipboards and words


so, I hope you have enjoyed seeing my project for this challenge
and I hope you can join in here in the fun, 
more details on how to enter are on the
Vintage Journey blog.

Thanks so much for having me here this month, 
Cheers
Adriana Bolzon XXX


Saturday, June 18, 2016

Altered Book - A Vintage Journey challenge

Hello Everyone and Welcome to my blog
Hope you are all doing good and have enjoyed a great week.

I have missed joining in on challenges over the past few years, due to Design Team commitments and with hectic life in general, I guess you can't do everything!!!
There is one challenge site that I have been eager to join in on the fun, it is called A Vintage Journey

To all the peeps that know me, well I love anything Vintage, and 
the Lovely Astrid is the host for this month challenge at A Vintage Journey
and her chosen challenge is

'Embossing Pastes/ Texture

This is what she says :
'Use any kind of texture paste, homemade, crackle, coloured or plain on your project . There is an endless variety available so play, have fun and apply it to your hearts content. Use it through stencils, randomly or in whatever way you want but remember it should be in one of the vintage, shabby, mixed media, art journaling industrial or steampunk styles that we favour. Put on your mixed media hat and create some magic.'

What a fabulous Challenge and looking at all the inspirational designers and entries projects inspired me to join in.

So here is my project for the challenge, An altered book, 
I just spread some Texture Paste through a stencil.


I love to alter old books, this was an old book I bought from an op shop for $1. I cut out the pages and used the cover, back and left the spine intact.

Front cover of altered book


Back cover of altered book
I coated the whole of the outside of book with Gesso, then
Using a Kaisercraft stencil (T602 Damask ) and spreading the Texture Paste over the stencil pattern, directly on to the book cover front and back.
 I left it to dry for a couple of days.


Detail of metal embellishments and texture paste with stencil


I then glued some lace, calico die cuts, metal embellishments from my stash
 (it feels so good to to be able to use some of my stash that has been in my craft room for years)


Front Cover of book 


Adhering Tim Holtz metal elements & some other Metal embellishments, I glued them on to the cover and back of book. I also applied another coat of gesso here and there.


I then painted the whole book with Distress Paints, (Broken China, Rusty Hinge, & Wild Honey) while the paint is still wet I sprayed water on to the paints to spread it around on all of the textures.

I left it to dry for a day and then added some
Couture Creations Glitzin' Glamour Glitter Glue - Crystallina


on to the Metal Dragonfly. (this looks so so pretty and glittery)


So I hope you like my Altered Vintage Book,
now I have to make the pages for the inside and
decorate them, I might make it a Art journal book.


Challenge site - A Vintage Journey


Thanks for looking
Cheers and Big hugsXX

Adriana XX


Tuesday, February 3, 2015

Australian Scrapbooking Ideas Issue #30

Hi everyone.......the lastest issue of 
"Australian Scrapbooking Ideas" Issue #30
is out NOW
I am very excited and fortunate to have 3 projects publishing in this issue.

Today, I will share the projects here on my blog,
but all the step by step and materials list
is in the magazine.

My commissioned and challenge was to alter recycling packaging.
I used an egg carton, Noodle box and a polystyrene takeaway container.
(ALL of them brand new)

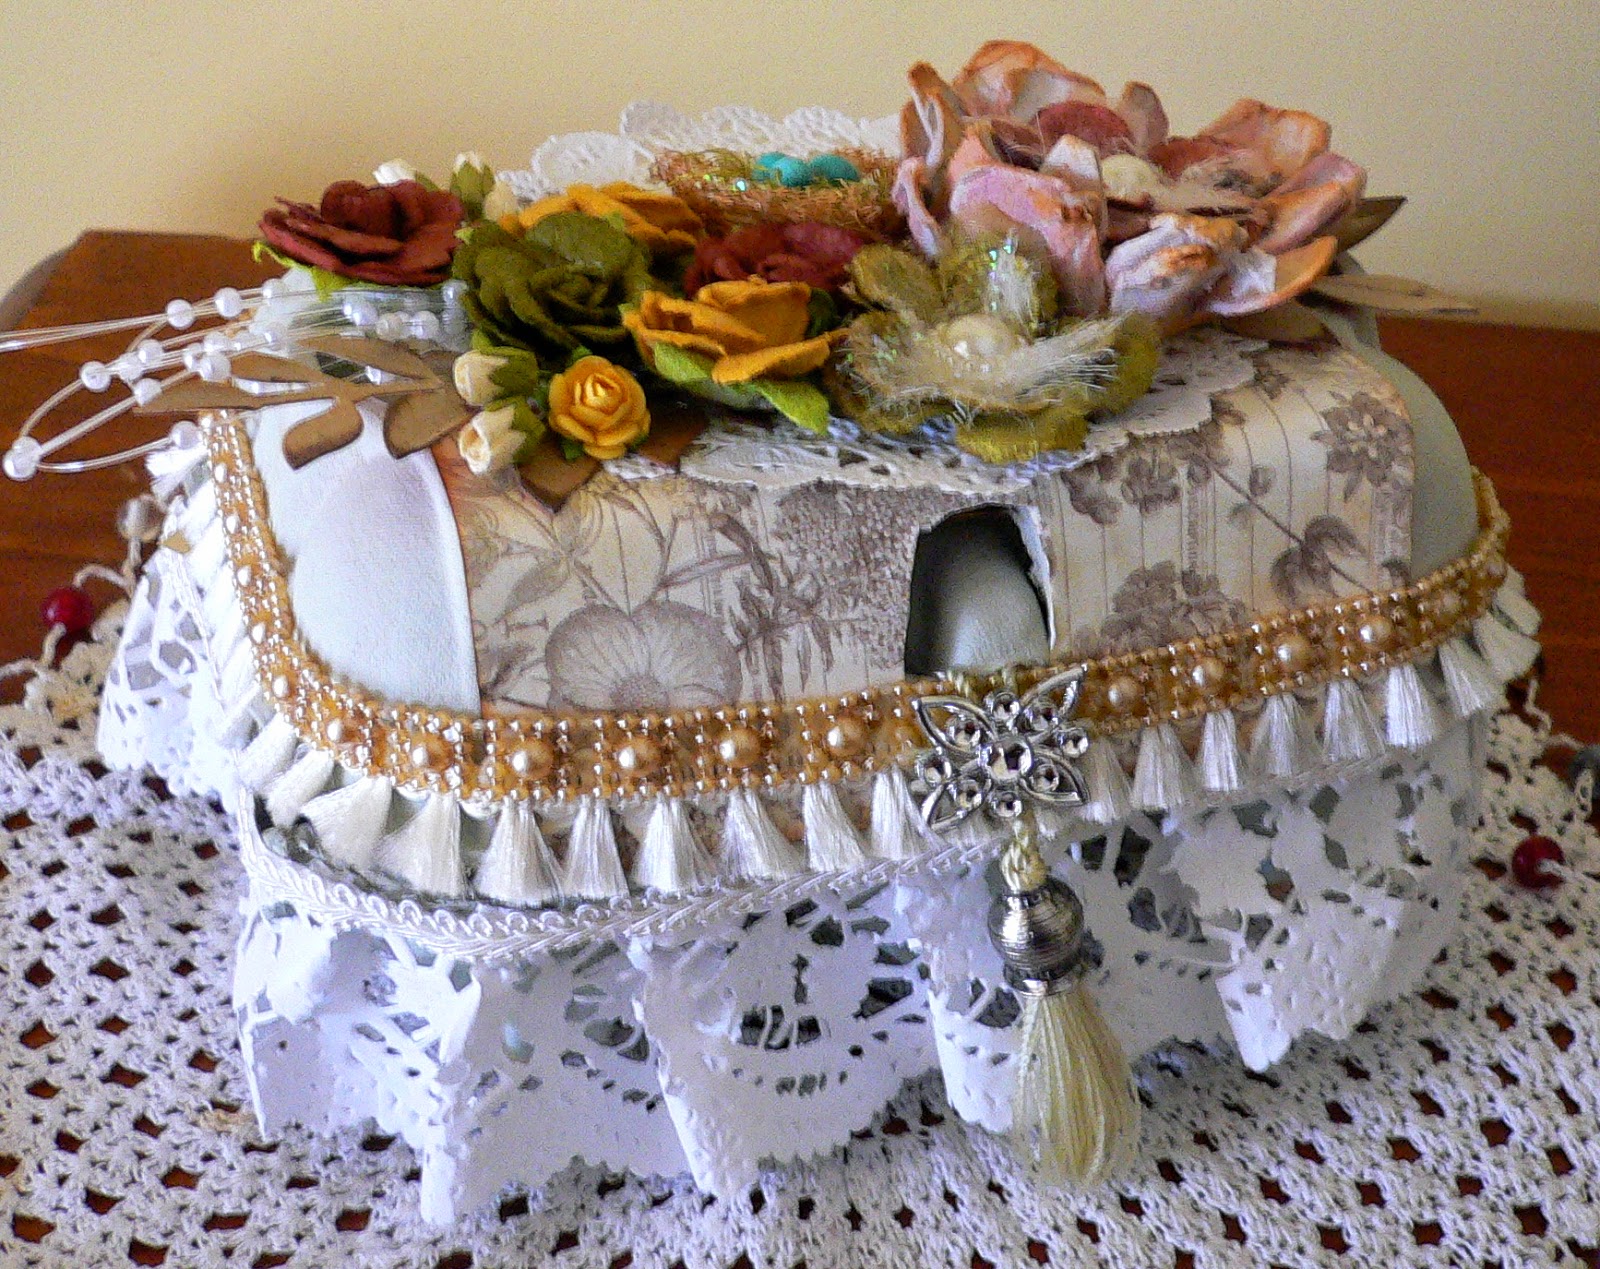
For the first altered packaging, I started with a (6) egg carton and I
converted it into a little sewing box. I decorated with many yummy
shabby chic embellishments and also created some flowers with 
egg cartons cup, more details on how to create these are
in the magazine.


Sewing BOX


I designed it to store many threads, needles and sewing ephemera.

Next, I used a Large Noodle box, and placed a fairy inside, I placed it on a stand for extra height. More details on how to make one yourself
is in the magazine.

Fairy in Garden

and my last box is a box to hold a baby gift for a baby shower
or even some takeaway cake.

"New Baby"


all the materials list and step by step instructions are in the
ASI magazine Issue 30, This issue has a bonus free gift paper pack
and many inspirational projects from many talented international designers.


Grab yourself a copy at your local scrapbooking shop or newsagent.


Until next time, 
Cheers xx :) Adriana 


Wednesday, November 26, 2014

"VIntage Home Sweet Home" Project


Hello!! there everyone,
is it my turn again today at Couture Creations
The best part of be on this wonderful Design Team, 
is having fun and playing with so many lovely designed dies,
 embossing folders and papers.

Today I have created a Vintage Home Wall hanging using the many diecuts from Couture Creations and along with the beautiful new papers,
Vintage Rose paper collection 
from Couture Creations, designed by Denise Boddey.

Loving these papers....
Here is the finished project.....


I found this wall hanging decor piece from one of
those cheap dollar shops and thought about altering it. 
I love altering items into something a little special and unique.


This is what it looked like before I altered it.
I covered the whole piece with the new papers called,


and I also cut out some diecuts with some of
the new dies soon to be released, and some previously released this year 
(and are still available to purchase fro your Local scrapbook store)


List of Couture Creations DIes
The Metricon - Art Deco Die C0723738
Vintage Rose - Border C0724045


Some close ups... Couture Pink Pearls C0721997
The Van Roe diecut - Butterfly C0723722
The Metricon - Art Deco Die C0723738
Vintage Rose - Border C0724045


I cut one Oval Nesting Die with the Vintage Rose paper collection and using double side foam tap, place in the centre of the plaque.
Then placed the decorated frame diecut on top
Placing a chipboard word from "Imaginairum Designs" "LOVE"

I also cut some Lucky tree diecut leaves with green cardstock
and placed them on the bottom of decorated frame.


Using the beautiful lace die around the bottom edges of the
Artdeco border diecut.


"Home Sweet Home"


 Couture Creations Pearls   C0721997
Please make sure you add your email address to get the latest newsletters.

Don't forget to join 
Couture Creations FACEBOOK

for all the latest updates from Couture Creations.

Thanks for looking
Cheers Adriana xx:)